Wednesday, 4 December 2013
Wednesday, 15 May 2013
Wednesday, 8 May 2013
Beach
Taken from a sketchbook drawing whilst on a long distant holiday in Portugal. Drypoint, chine collé and a tiny bit of monoprint.
Monday, 29 April 2013
Wednesday, 24 April 2013
Monday, 1 April 2013
My practice – part 6
Now I am have 3 blocks cut and etched, I want to do a test print to check if the blocks will register and sit on top of one another neatly. The test is on proper paper (Somerset white 300gsm) and will help me make decisions about use of colour, transparency or physically editing the blocks themselves. Firstly, I check the blocks are the same size as each other and trim when necessary. My system of registration is a shown here. I tape a template of card onto the bed of the press, and always put the blocks and paper in the same place. It is a bit longwinded to explain here, so if any one wants a more detailed explanation, please ask.
Referring to the original print Historia (see part 1), I already know that I want a 'blend' to start with which represents the sky/water divide, so I role one onto the base block, which is just a plain piece of lino cut to the right size. The blend consists of a dab of extender/moss green/yellow/extender which is then rolled until it blends together as above. Then I roll it onto the lino, roughly where I think it should be.
Second stage, with the first textured block on top of the blend. Notice the ink changes colour from light grey at the top to pink, then blue/grey in the water. This is just another blend rolled onto the textured plate.
Third stage. Second textured plate on top.
I look around the edges of the print to see how close the registration is. I can see that on the left hand side, the base plate is slightly bigger than the two others on top of it, so I know I need to trim it.
Here is the key plate on top. Now I can make some decisions. One thing I will do is bite at least one more water texture plate. I will trim the plates that need it, and think about the colour and transparency. For instance, I want the darker grey clouds to 'fade' as they reach the skyline/building, so I need to make that ink more transparent with extender.
Wednesday, 27 March 2013
My practice – part 5
3rd block after overnight etch has been cleaned off with water.
Here's the proof.
Again, I have scanned in the 3rd block proof into the computer and overlayed it onto the previous 2 blocks in photoshop. This enables me to play around with colour, transparency, editing the blocks and preparing new ones. I have decided that the 'pink' sky block needs some more white space, so I am going to etch away more of the 'sky'. Also, I will cut 2 more blocks and etch more water marks, as I want a really textured and complex layered effect.
3rd block before printing.
Again, I have scanned in the 3rd block proof into the computer and overlayed it onto the previous 2 blocks in photoshop. This enables me to play around with colour, transparency, editing the blocks and preparing new ones. I have decided that the 'pink' sky block needs some more white space, so I am going to etch away more of the 'sky'. Also, I will cut 2 more blocks and etch more water marks, as I want a really textured and complex layered effect.
Sunday, 24 March 2013
My practice – part 4
Here is the second block after an overnight etch.
Something I forgot to mention earlier is how I remove the thick stopout from the block. I use a cleaning chemical called greenwash and a scrubbing brush. Alternatively, you can use white spirit. It takes several goes to get rid of the stopout, and eventually I resort to scrapping the last stubborn islands off with a stanley knife blade.
Here's a close up of some of the texture.
And here is the second block proof.
I have scanned in both proofs and manipulated then in photoshop to give me some idea of how they interact with each other, how they look etc. This helps me decide if I want to edit the blocks themselves in some way, maybe cut parts away or re-etch parts. Also I can use this to help me plan the next block.
Something I forgot to mention earlier is how I remove the thick stopout from the block. I use a cleaning chemical called greenwash and a scrubbing brush. Alternatively, you can use white spirit. It takes several goes to get rid of the stopout, and eventually I resort to scrapping the last stubborn islands off with a stanley knife blade.
The cleaned second block.
And here is the second block proof.
I have scanned in both proofs and manipulated then in photoshop to give me some idea of how they interact with each other, how they look etc. This helps me decide if I want to edit the blocks themselves in some way, maybe cut parts away or re-etch parts. Also I can use this to help me plan the next block.
Saturday, 23 March 2013
My practice – part 3
Here is the block after its overnight etch...
A closer look at the cleaned block. The next stage is to proof it, and see what will print.
Proofing in black means you get to see clearly what marks you have.
Here's the inked up block.
And here is the first proof. So, from this I can start to plan the other blocks in more detail.
For instance, I am pleased with the broken edge where the buildings and river meet, but I may need to reinforce this separation later. I can also visualise how the river might begin to look if I layer 3 or 4 blocks with similar marks.
With the first one in mind, I can begin to paint stopout onto the second block. This one only has sky and water, with no architecture in it. I have roughly traced and drawn where the buildings are on the key block, so I see where the painted marks need to be.
... and cleaned off. Notice how much of the stopout has been eaten away by the caustic etch. For me, one of the pleasures of this process is the way that the end result is partly out of my control.
Proofing in black means you get to see clearly what marks you have.
Here's the inked up block.
And here is the first proof. So, from this I can start to plan the other blocks in more detail.
For instance, I am pleased with the broken edge where the buildings and river meet, but I may need to reinforce this separation later. I can also visualise how the river might begin to look if I layer 3 or 4 blocks with similar marks.
With the first one in mind, I can begin to paint stopout onto the second block. This one only has sky and water, with no architecture in it. I have roughly traced and drawn where the buildings are on the key block, so I see where the painted marks need to be.
Monday, 18 March 2013
My practice - part 2
Now for the caustic soda etch. The solution is very corrosive so it is important to wear protective gloves and goggles when mixing and applying. The caustic soda crystals and wallpaper paste can be bought at any hard wear shop. When you mix the solution, use a plastic container, not a metal one and try to be in a well ventilated room or even outside. I stir the solution with a wooden stick and use a nylon brush to apply it to the block. The etch recipe is:
Put 250 ml of water in the plastic container
Carefully add 3 tablespoons of caustic soda
Stir with the wooden stick/spoon until dissolved (this gives off a nasty fume, so be aware)
Add 1 tablespoon of wallpaper paste and carefully stir until absorbed into the mixture
Top left picture: Water/soda mix. Top right: It is useful to have a second plastic container with water to put your stick and brush in. Bottom: The solution eventually becomes gloopy after the wallpaper paste is added and mixed in (this takes about 4 – 5 mins).
The first application sits on the surface and takes time to absorb into the areas of the block it can reach through the stop-out. After 1 hour, I re-apply a second coating of paste.
Again, after another hour, I apply a third coating. The paste is now sitting thickly on the surface of the block.
After 3 to 4 hours, it looks like this. The yellowing of the block indicates the caustic etch is working. Now at this point (depending on what effect you want) you can wash off the caustic etch with water and a scrubbier, using gloves. The option here is to see how deep the bite is, and perhaps repeat the whole process by reapplying a freshly mixed caustic solution.
Here is the cleaned block, drying on a hotplate.
Sunday, 17 March 2013
My practice - part 1
The original print had several layers created by overlaying several blocks of lino, so I have started by cutting three blocks at 60 x 60cm. I may need more blocks eventually, but I can cut those later. I use lino bought from an art shop which can be delivered in a large roll, so I can cut the sizes I want from it.
I am going to start with the "keyplate" which is the potential final layer to be added to the print. It is a London skyline. I have photocopied a printout from a manipulated photograph I have taken, and then transferred the photocopy onto the lino. Remember to reverse the image onto the plate so that when you print it is the right way around.
Once transferred, I have begun by cutting into the lino, using traditional linocut tools. I decided at this stage to cut the sky away, but using horizontal cuts only, just in case I want to use the marks that the cut-away part of the block gives me later on. It is just an option, which I may or may not use.
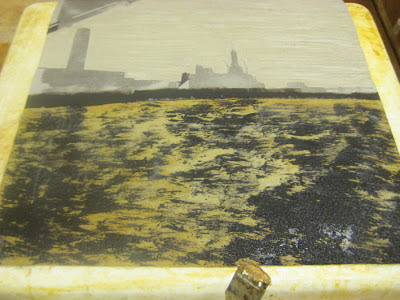
Here is the block with the sky cut away and an application of thick stopout where the cityscape meets the Thames.
I have painted this line to protect the lino beneath from the caustic soda etch that I will apply later. I want the "edge" where the city meets the water to be more ragged and not a cut mark.
I have then applied more thick stopout to the block with a stiff scrubbing brush to give me a textural mark. From experience, about 40 to 50% of this stopout will be eaten away by the caustic etch, so what you see, ain't necessarily what you get!
Sunday, 3 March 2013
Subscribe to:
Comments (Atom)


